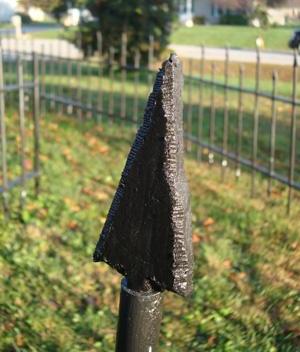
DIY Halloween project: Building a cemetery fence for your yard
After years of the kids making fun of me for having most of my Halloween decorations inside where I could see them, I decided a few years back to work on some outside decor. A cemetery in the front yard seemed the obvious choice for maximum impact. Making tombstones was a great family project, which I will provide directions for later, but the PVC stakes I put around them to mimic a fence just didn’t do them justice. So this year I decided it was time to enhance the staging.
I began the project by gathering and cutting my main materials. Furring strips come in packs of six so I purchased four so that I could make ten fence sections and reserve four to create a gate at a later time. In trying to save, I first purchased 17 1/2 inch PVC pipes, thinking that five vertical bars per 10′ section would suffice. Though they were somewhat acceptable, after constructing the first one I decided more bars would create a more realistic look and that my fence was too plain. So, I added another six bars, one in between each of the existing bars, and made them shorter so that a spear shaped finial could be added to both the top and bottom of them to dress up the fence. So in the end I cut 17 of the 1/2″ PVC pipes into thirds and the other 15 1/2″ PVC pipes into fourths. I also cut 10 1″ PVC pipes into thirds. I used a hacksaw which cut easily through them, though a power saw of some kind would have sped that process up substantially. Next, for both the 1/2″ and 1″ PVC pipes that were cut into thirds, I cut a 45 degree angle on one end so they could be more easily driven into the ground. The pipe cut in fourths I did not make an angle cut on as they would have finials on both ends. A quick sanding across the ends smoothed them. The I put the sandpaper in the palm of my hand and gave each pipe a quick turn in it to knock off the remaining bits of PVC left from the cutting.
Next, I began painting all the pipe and furring strips. On the first prototype, I drilled holes for my pipes in the furring strips before painting it. The problem that resulted was when paint dripped in the hole it prevented the pipe from fitting so the holes had to be sanded out. That is why I chose to paint first on later sections. To make the painting go faster, I lined all the furring strips up on two saw horses and painted them with a paint roller and primer followed by two coats of exterior black paint. I actually had the primer and paint from another project, but have added a cost estimate to the materials list so that it is complete. I hurried through this part, knowing that they would have to be touched up in the end. Specifically, since only a small line on each furring strip was touching a saw horse, I turned them to paint all four sides while they were still wet, though I left more time in between coats.
To paint the PVC I laid them across the sawhorses and used the roller to prime them, turning them several times. However, during this process I happen to run across a webpage that gave an awesome tip (http://www.instructables.com/id/Halloween-Cemetery-Fence/#step1) and changed methods. The author had put a sock over his hand and dipped that in the paint than just pulled each pipe through his hand. This method worked very well and was much faster, even on the 1″ pipe. I put a piece of furring strip between chairs and leaned the pipes on that to dry. While they were drying I moved inside to watch the Halloween selections on TV while doing the next stage.
I already had foam insulation from another project and needed about 1/4 of a sheet to cut out all my finials. I started by making a cardboard pattern for two types of finials. One pattern was longer and more pointed spear shape for the main bars and the other was a short spear shape for the short bars. I also left a stem about two inches long on each of them for use in securing them by pressing the stem inside the pipe. I first cut strips the width of my finials from the insulation and pulled off the plastic coating from both sides. I used scissors to cut them into rectangles of the length I needed for each type of finial. Next, using the patterns and an exacto knife I cut out the shape. Then I took the exacto knife and trimmed to get as clean an edge as possible along the spear and also to take off excess on the stems so that they fit into the 1/2 inch hole in the pipe.
To enhance the finials a bit more, I took a rotary tool with the cut wheel attachment and gently did a quick pass along the edge at slow speed to give it a kind of hammered looked. Finally, I took my fingernails and scraped along each edge to pull off residue that had gathered along the cuts. A brush seemed the easiest way to paint these so that the bristles could be poked into the wholes or rough edges. They don’t require priming and one coat covered them sufficiently.
Back outside, it was time to bore holes in the furring strips. A 7/8″ drill bit was just about the right size for the pipes once they had been coated with paint. Some went in easily, while others scraped the paint a bit, which was expected. I also turned the furring strips sideways and drilled a hole on the ends with a 1/8″ bit, which was just the right diameter to push 8″ cable ties through.
After the holes were drilled I secured some scrap pieces to a board laid across the saw horses to create stop for assembling the fence sections. I also put a piece on each end a 1/2″ in front of the stops so that I could lay the top furring strip in and it would be held in place. I slid the pipes through the holes and secured them with screws so that the tops would be exactly even. The longer pipes I left sticking out 8″ from the furring strip and the short ones protruded 4″ out. With an 11/64″ bit I drilled a whole through the furring strip and into the pipe, though I didn’t go through both sides. Then I secured them with a 1 1/4″ drywall screw. Not all of them reached the other side of the wood, but 1 1/2″ screws were not available and the shorter ones were sufficient to hold the pipes in place. Next, with the top furring strip still held by my scrap wood I pushed the bottom strip on the pipes. I repeated the drilling and screwing process, but only on the shorter pipes, which I wanted to hang below the strip exactly 4″ as they did on the top.
My fence was now ready to assemble! Unlike, the author’s on the site mentioned above, my fence stands by itself without the use of rebar or added support. With a rubber mallet, I hammered a 1″ pipe into the ground several inches. Luckily it had rained a couple of days before, if the ground is too dry when I drive in pipes for my other decorations, I water it first to make it easier. Softer ground requires a less forceful blow and helps prevent damage. Using a cable tie, I attached to top furring strip to the 1″ pipe. Next, I stood the fence upright in where I wanted it and gave a few lighter taps to each of the taller pieces of pipe to keep them balanced. At the other end I drove in another 1″ pipe and cable tied it to the furring strip. This was repeated with each section.
After the sections were in place I actually went back and clipped the cable ties so that I could just have a single one going around each 1″ pipe and both the furring strips on either side of it. I also secured the bottom furring strips this way and hammered some more on the taller pipes anywhere that the furring strips between sections didn’t match exactly.
To finish off the fence, I pushed in the finials and then coated the whole thing with a quick spray of Rust-Oleum Hammered black paint. The paint is great for making the PVC pipes look more like wrought iron. If money is not a concern all coats could be done in this paint. Finally, I took some skulls I had purchased for 75% off after Halloween a few years back and using a glue gun stuck them to the 1″ pipes. They are not listed in materials below as I plan to make something else in the future to go there, but had enough of these to use for now.
You can find several similar fences online and also use real fences for ideas on what you want yours to look like. I chose a very simple design because I am very inexperienced with this type of project. In fact, this was by far the most I have used any of the tools I had on anything, so I know any beginner could do this!
Materials & Tool List including amount needed for 10 fence sections:
- 1/2″ x 10′ PVC pipe @ $1.88 ea. (used 32 = $60.16)
- 1″ x 10′ PVC pipe @ $3.08 ea. (used 4 = $12.32)
- 1″ x 2″ x 8′ furring strips @ $1.08 ea. (used 20 = $21.60)
- 8″ black cable ties @ 20 for $2.19 (used one pack = $2.19)
- Dow 1/2″ x 4′ x 8′ Extruded Polystyrene Insulated Sheathing @ $8.68 (used about 1/4 of the sheet = $8.68)
- 6 x 1 1/4″ fine drywall screws @ $6.47 for box of 90 (used one box = $6.47)
- Exterior Black paint @ approximately $20 per gallon (used 3/4 of a gallon = $20)
- Kilz 2 @ $15.98 gallon (used less than 1/4 gallon = $15.98)
- Black Rust-Oleum Hammered spray paint @ $7.47 (used 4 cans = $29.88)
- Total cost = $177.28 ($17.70 per section)
Tools included:
- Drill with bits in sizes 7/8″, 11/64″ and 1/8″
- Hack saw
- Phillips head screw driver
- Sock
- Paint brush
- 4″ paint roller
- Rotary tool & cut-off wheel
- Rubber Mallet